.png)
Multimodal Data Extraction for AI Applications using Python
- Yash Sakhuja
- Mar 22, 2025
- 6 min read


Large Language Models can assist in answering complex questions not just based on text queries. Over time, LLMs are also becoming increasingly proficient at handling multimodal data, including videos, audio, and images. This brief blog post discusses how we can extract data in various forms and utilise it to support our Retrieval Augmented Generation (RAG) applications.
If you're curious about how this could benefit you and what the potential applications might be, let me explain why I needed it initially. I wanted to create an AI speech coach (AI Agents) for myself that could take my recorded toastmaster practise speeches and convert them into multiple formats—text (script), audio (voice), and frames (body language). It would analyse these videos from different perspectives and provide a report on my speech to help me improve. This is just one example I have in mind. I'm confident that knowing this extraction process will make it much easier for you to develop more purposeful Multimodal RAGs. I'm eager to see some powerful use cases.
We'll do all this in just 5 simple steps. Let's jump right into how we can enter a YouTube video URL, utilise it to extract the video and audio, transcribe it, and then extract frames (images) for a thorough analysis- all using pure python.
Note: Using GPUs can greatly accelerate the process. However, if GPUs are unavailable, don't let that discourage you from trying. Without a GPU, I suggest opting for a shorter video to speed up the process and prevent system crashes.
Setting up File Directories
Begin by handling some preliminary tasks, such as supplying the YouTube URL we need to extract and specifying all the output folder locations within our root directory where we want to save our final output files.
from pathlib import Path
import os

# SETTING UP CONFIGURATIONS
video_url ="https://youtu.be/1aA1WGON49E?feature=shared" # Change to your URL
output_video_path = "./video_data/"
output_folder = "./mixed_data/"
output_frames_path = os.makedirs("./mixed_data/frames/", exist_ok=True) or "./mixed_data/frames/"
output_audio_path = "./mixed_data/output_audio.wav"

filepath = output_video_path + "input_vid.mp4"
Path(output_folder).mkdir(parents=True, exist_ok=True)
Let's give this a try with a brief 1-minute video from a Tedx Talk by Woody Roseland.
Downloading the Video
The python snippet below downloads and trims YouTube videos using yt-dlp and ffmpeg. The download_video function takes a video URL, an output directory, and an optional start time (here 11 seconds as an example). A start time might be necessary to trim the initial seconds of silence in a video before the main content begins.
It first downloads the video in the best available quality using yt-dlp, saving it as input_vid.mp4. Then, it uses ffmpeg to trim the video from the specified start time without re-encoding, ensuring fast processing and minimal quality loss. The trimmed video is saved as trimmed_vid.mp4, and the function returns metadata, including the video’s title, uploader, and view count. Once this step is finished, you will have a video file downloaded from YouTube and stored locally. The duration required to finish this download will vary based on the video's size.
To run this code, ffmpeg must be installed on your system. ffmpeg is open-source software that allows for the efficient management of images, videos, audio, and other multimedia files through a collection of libraries. To install ffmpeg on your system, refer to the installation steps for macOS and Windows provided in the link.
import yt_dlp
import subprocess

def download_video(url, output_path, start_time=34):

    """
    Download a video from a given URL using yt-dlp, trim it from a specific start time, and save it.

    Parameters:
    url (str): The URL of the video to download.
    output_path (str): The path to save the video.
    start_time (int): The start time in seconds (default: 21s).

    Returns:
    dict: Metadata of the downloaded video.
    """

    video_path = f"{output_path}/input_vid.mp4"
    trimmed_path = f"{output_path}/trimmed_vid.mp4"

    ydl_opts = {
        'format': 'bestvideo+bestaudio/best',
        'outtmpl': video_path,
        'merge_output_format': 'mp4',
    }

    with yt_dlp.YoutubeDL(ydl_opts) as ydl:
        info_dict = ydl.extract_info(url, download=True)

    # Trim the video from start_time onwards
    ffmpeg_cmd = [
        "ffmpeg", "-y", "-i", video_path,  # Input video
        "-ss", str(start_time),  # Start at 34 seconds
        "-c", "copy", trimmed_path  # Copy streams without re-encoding
    ]
    subprocess.run(ffmpeg_cmd, check=True)

    metadata = {
        "Author": info_dict.get("uploader", "Unknown"),
        "Title": info_dict.get("title", "Unknown"),
        "Views": info_dict.get("view_count", 0),
        "Trimmed Video": trimmed_path
    }

    return metadata

metadata_vid = download_video(video_url, output_video_path)
print(metadata_vid)
Video to Audio
Now, with the video file saved locally let's start by extracting the audio from a video file using the moviepy library. The video_to_audio function takes two parameters: video_path, the path to the video file, and output_audio_path, where the extracted audio will be saved. It first loads the video using VideoFileClip, retrieves its audio, and writes it to the specified output file.
from moviepy import VideoFileClip

def video_to_audio(video_path, output_audio_path):
    """
    Convert a video to audio and save it to the output path.

    Parameters:
    video_path (str): The path to the video file.
    output_audio_path (str): The path to save the audio to.

    """
    clip = VideoFileClip(video_path)
    audio = clip.audio
    audio.write_audiofile(output_audio_path)

# Function Call
video_to_audio(filepath, output_audio_path)
Video to Image Frames
This script extracts frames from a video using ffmpeg with optional GPU acceleration via CUDA. The video_to_images_ffmpeg function takes a video file, an output folder, and a frames-per-second (fps) parameter (example: 30). It creates the output folder if it doesn’t exist and then executes an ffmpeg command to extract frames at the specified fps, saving them as sequentially numbered PNG images. The -hwaccel cuda flag enables GPU-based decoding for faster processing, making this method efficient for tasks like object detection, video summarisation, or frame-by-frame analysis in deep learning applications.
import os
import subprocess
def video_to_images_ffmpeg(video_path, output_folder, fps=30):
os.makedirs(output_folder, exist_ok=True)
# FFmpeg command for extracting frames with GPU acceleration
ffmpeg_cmd = [
'ffmpeg',
'-hwaccel', 'auto', # Use GPU if present else falls back to CPU
'-i', video_path, # Input video path
'-vf', f'fps={fps}', # Set frames per second
os.path.join(output_frames_path, 'frame%04d.png') # Output files
]
# Execute FFmpeg command
subprocess.run(ffmpeg_cmd, check=True)
print(f"Frames saved to {output_folder}")
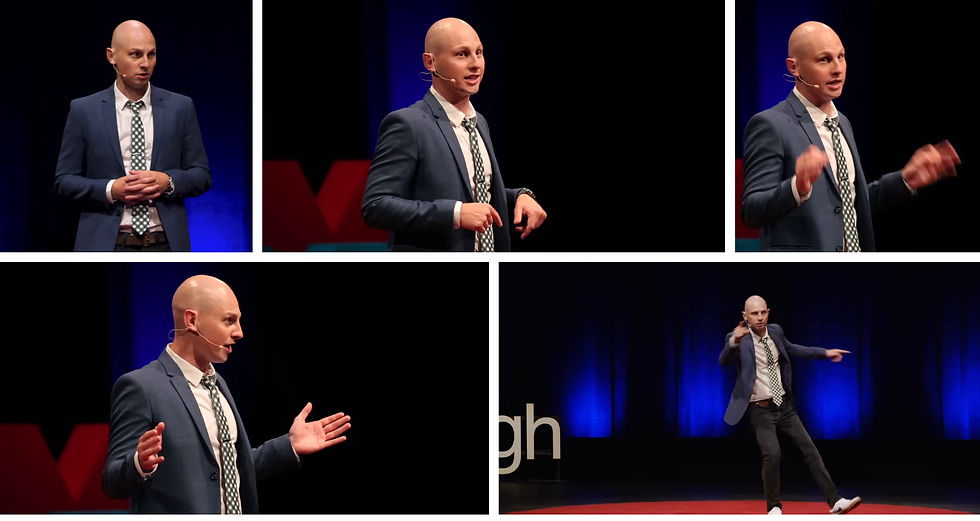
video_to_images_ffmpeg("video_data/input_vid.mp4", "frames", fps=30)
From the sample frames shown in the images below, you can now easily infer how AI could be effectively utilised to interpret and comment on the speaker's body language, facial expressions, hand gestures, and more.
Video Transcription with OpenAI Whisper
This snippet below performs automatic speech recognition (ASR) using OpenAI's Whisper-Large model from Hugging Face's transformers library. It starts by checking GPU availability using PyTorch and selects the fastest available device (GPU if present, otherwise CPU). The Whisper pipeline is then initialised to transcribe an English audio file (output_audio.wav), capturing both spoken text and timestamps. The script saves the transcribed text as a plain text file (output_text.txt) and also stores the full transcription data—including timestamps and metadata—as a JSON file (output_data.json). This approach enables efficient speech-to-text conversion, making it ideal for applications like podcast transcription, video subtitling, and speech analytics, while leveraging GPU acceleration for faster processing.
from transformers import pipeline

# Checking if you have GPU availale or not- Returns True if present
import torch
print(torch. __version__ )
print(torch.cuda.is_available())

whisper = pipeline("automatic-speech-recognition", model='openai/whisper-large', device=0) # 0 for GPU, -1 for CPU

text = whisper('mixed_data/output_audio.wav',return_timestamps=True,generate_kwargs={'language':'en','task':'transcribe'})

with open(output_folder + "output_text.txt", "w", encoding="utf-8") as file:
    file.write(text['text'])

# Save the entire dictionary as a JSON file with timestamps and transcribed speech
import json
with open(output_folder + "output_data.json", "w", encoding="utf-8") as json_file:
    json.dump(text, json_file, ensure_ascii=False, indent=4)
Here's the transcribed output for our sample TedX video:
Wow, what an audience. But if I'm being honest, I don't care what you think of my talk. I don't. I care what the internet thinks of my talk. Because they're the ones who get it seen and get it shared. And I think that's where most people get it wrong. They're talking to you here, instead of talking to you, random person scrolling Facebook. Thanks for the click. You see, back in 2009, we all had these weird little things called attention spans. Yeah, they're gone. They're gone. We killed them. They're dead. I'm trying to think of the last time I watched an 18-minute TED Talk. It's been years, literally years. So if you're giving a TED Talk, keep it quick. I'm doing mine in under a minute. I'm at 44 seconds right now. That means we got time for one final joke. Why are balloons so expensive? Inflation.
We began with merely a YouTube video URL, and from that, we extracted the video, audio, frames, and transcriptions. This provides a variety of relevant data formats for you to input into LLMs to achieve the best possible results for varied use cases.
I hope you found this helpful. If you have any ideas for enhancing this code, please don't hesitate to reach out to me. I believe that a fresh perspective can always bring improvements. Also, remember to leave a comment about your use cases or if you found this blog post beneficial.
Please Note: If you need help setting up NVIDIA GPU for this task, this tutorial here could be helpful.


This is a really helpful tool and well explained too. I will give it a try :)